March 30, 2009
Shutter Priority Mode

March 23, 2009
Aperture Priority Mode


March 16, 2009
Program Mode

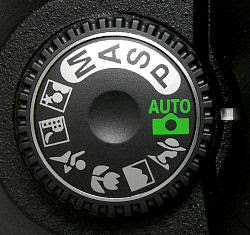
Is your DSLR stuck in Auto Mode? Would you like to be able to get more out or your camera? We all know that command dial on the top of our cameras ... most of them have all those great automatic modes like landscape, portrait, sports, and so on. But what are those modes that are just letters? Things like P, S, A, and M or maybe P, Tv, Av, and M ... These are the advanced modes of Program, Shutter Priority, Aperture Priority, and Manual. This is part one of a four part post dealing with the advanced shooting modes on DSLR cameras and the modes that exist on some advanced compact cameras. This particular post will deal with the Program Mode and in other posts to come will deal with the other modes. So lets get started!
Program Mode - If you have only used Auto Mode on your camera, Program Mode is a good place to start. On most cameras Program Mode is selected by moving the Mode or Command Dial to the (P) setting. A lot like Auto Mode, Program Mode still selects the appropriate aperture and shutter speed, so you have no worries about not having a correctly exposed picture. So why use this setting? Well, when using Program Mode, your camera will now unlock some settings that you previously had no control over. These settings vary depending on the camera make and model you own. Some of these settings may be the ability to change the ISO (discussed in a previous blog entry), to change the white balance (which will be discussed in a later blog entry), be able to shoot continuous and self timer modes (the ability to shoot fast bursts of pictures and to be able to push the shutter release button and run to get in the picture), and be able to use exposure compensation (this allows you to adjust the exposure up and down to achieve the proper exposure).
The main advantage to using Program Mode is that it is great for easily getting a great photograph without having to think too hard about settings. But you will now gain some control over advanced settings in your camera. So now go out and give it a try and be sure to check in next week to find out about Aperture Priority Mode.
March 9, 2009
What Is ISO And How Does It Affect My Pictures
 The International Organization for Standardization or "ISO" defines both an arithmetic scale and logarithmic scale for measuring color-negative film speed. Although, in digital camera systems there is an arbitrary relationship between exposure and sensor data values which can be achieved by setting the signal gain of the sensor. So what does that mean for you? Well, ISO is the measurement of the speed of film or how sensitive it is to light. A low ISO film is not very sensitive to light and the higher the ISO rating the more sensitive to light the film is but there is a trade off. The higher you go with the ISO rating the larger the film grain which means that more grain will be seen in the final product. When using a film camera, it is typical to shoot with a low ISO film (ISO 100 or ISO 200) for photography in normal daylight or for portraiture in a properly lit studio (due to the lack of visible grain in the finished product). ISO 400 film is typically used in lower light situations, such as, well lit indoor pictures. ISO 800 and ISO 1600 films are available for photography in very low light situations.
"Here's the secret that governs film speed: Doubling the ISO number of the film doubles its sensitivity to light. So ISO 200 film needs half the light to take the same picture as ISO 100 film. ISO 400 film needs a quarter of the light that ISO 100 needs. In other words, you could capture a low-light scene with a shutter speed of 1/15 second with ISO 100 film, or 1/60 second with ISO 400. That's an incredibly powerful capability that means the difference between getting a blurry mess and a sharp photo." ~ Dave Johnson
Who cares, right? ... I mean we are dealing with a digital camera world. You can't put film in a DSLR! No, but we are able to adjust the ISO of our digital cameras. Which means that by controlling the ISO adjustment on our digital camera we are mimicking loading different speed film into our cameras.
My digital camera shoots at ISO 3200 so I will just set it to that and shoot away. Well, that statement is not necessarily right. There is a down side to shooting at high ISO settings on a digital camera. The big one is that the higher you go with the ISO setting the more "noise" will be visible on the picture. You should always shoot at the lowest possible ISO setting at all times. In most normal conditions, stick with the cameras lowest ISO setting, since that will provide you with a picture with the least amount of digital noise. But when you notice the camera recommending a very low shutter speed (less than about 1/30 of a second for handheld shots) it is time to raise the ISO. Just remember that when you are done shooting at the higher ISO speed to lower it back down so your camera is ready for the next time you use it. To reiterate, do not be afraid to use a higher ISO setting just remember that the higher you go the more noise you are going to see on the picture.
March 2, 2009
Shooting Photographs With Feeling

"I used to teach piano, specializing in jazz improvisation. (Many photographers, including Ansel Adams and Gordon Parks, were/are musicians. Many musicians, including Graham Nash, are also avid photographers.) I’d like to share with my fellow photographers some of the conversations I had with my first-time piano students – which actually have something in common with my photo workshops students. Here we go!Student: "Rick, do you think I should use a blues scale for my solo . . . or do you think maybe playing in fourths [very open sound] would be better?"Rick Sammon: "It does not matter what notes you play, it matters how you play them."Student: “Uh . . . that really helps me, Rick. Okay, do you think my solo would sound better on a Hammond B-3 organ or a Fender Rhodes electric piano or a Yamaha grand?"Rick Sammon: "Personally, I like the organ . . . and the piano . . . and the synthesizer . . . and the grand piano. But have you ever considered the accordion? Billy Joel uses it, and so does Toots Thielemans."Getting a bit agitated at this point, the student says, "Fine, you are a big $#%! help. I'm not taking lessons from someone who can't teach me anything. I'm out of here." Smiling, hoping that I can keep the student, who I really want to help because I truly enjoy teaching, I say, "Before you go, I'd like to give you some free advice, if I may."Student: "What's that, maestro?"Rick Sammon: "Don't think so technical, although technique is important. When you play, play with feeling. Play with passion. Above all . . . play for yourself."Reactions to my comments varied, from a big smile to eyes filling up with tears.In case you were wondering, I did keep all my students. (I've had participants on my photo workshops get emotional in portfolio reviews on more than on occasion. That's very understandable. I know how important photography is to each and every person.)" ~ Rick Sammon