May 18, 2009

The Rule Of Thirds And How To Break It

What exactly is the “Rule of Thirds”? The rule is simple to explain but for some it may be hard to put into practice. You should imagine breaking an image down into thirds, both vertically and horizontally, so that you have 9 segments like the demonstration below.


This is basically a tic-tac-toe board. Too often photographs have the subject placed directly in the center of the frame, which makes the picture look dull and uninteresting. To keep this from happening try to place the subject on one of the horizontal or vertical lines. The easy way to properly follow the rule of thirds is to not have your subject directly in the center square. Sound simple?

Now on to breaking the rule … a photographer may want to break the rule of thirds to add an artistic flair or to add drama to a photograph. But be aware that breaking the rule may be harder than it seems.

Hopefully this post will help you to understand the rule of thirds.

May 11, 2009

RAW vs. JPEG

What is the difference between the two file types? Well, JPEG (aka Joint Photographic Experts Group) is a is a commonly used method of compression for photographic images. The degree of compression can usually be adjusted, allowing a selectable trade off between storage size and image quality. JPEG typically achieves 10:1 compression with little perceptible loss in image quality. Hmmm ... "perceptible loss in image quality". Even though there is the word "little" in front of perceptible there is still a loss in image quality. JPEG compression, in my opinion, is a lousy format that throws away the data that you can’t see in order to give you smaller file sizes, but if you don't need high quality images and need a small file size JPEG is definitely for you.

Then what is RAW? A RAW image file contains minimally processed data directly from your camera's image sensor. RAW format is completely loss-less and keeps every piece of data your camera captures (even if you don’t need it). There is one down side though ... RAW format requires a good bit more space on your memory card because it does store every bit of information from your camera's sensor. However, a RAW file isn’t technically an "image file" (in the true since of the word). It has to be converted by special software on your computer and processed in order to be suitable for printing or exporting for other uses. So, why shoot in RAW format? Since RAW format stores every bit of data from your camera's sensor if you screw up a picture it is almost always fixable. Lets say you shoot a picture on a bright sunny day (a once in a lifetime photo) and you don't realize that it was overexposed until you get home and view it on you computer -- if you shot in RAW you could easily adjust the exposure to be properly exposed. So to sum this up, If you are not going to bother processing your photos, RAW is not for you.

So what does all of this mean for your pictures? Well there are pros and cons to shooting both RAW and JPEG images. Many people choose to shoot in JPEG format because it is a universal format which can be taken directly off of the camera and shared via email or published to the Internet. JPEG format also requires less storage space on your camera and computer. RAW, on the other hand, requires some post production work. You will need software to properly edit and export your photos. This software sometimes comes with you camera, and sometimes needs to be purchased. Programs like Aperture (from Apple), Adobe Lightroom, and Adobe Camera RAW in Photoshop are great programs for editing RAW files. I, being a Mac guy, prefer Aperture but I also use Photoshop quite a bit. But even if you view photography as a simple hobby, it is still worth investing in photo-management software like Aperture or Lightroom that make organizing, keywording, searching, and editing your RAW photos as simple as working with JPEGs.

I sure hope this helps you with your decision over the "Great Debate" of RAW vs. JPEG.

May 4, 2009

Black & White Photography In The 21st Century

So what is different about black & white photography nowadays as apposed to fifty years ago? Well, a good bit has changed. Most people now use a digital camera as apposed to a film camera, most people also edit their pictures on a computer instead of in a dark room (post-production), and most people shoot their pictures in color and then convert them to B&W. This post has to deal with the digital camera users since B&W film is still readily available.

So how do I shoot black & white photos with my digital camera? There are two different ways and the pros and cons of both will be discussed here.

You say your camera has B&W setting? Most DSLR’s and point and shoot cameras have a B&W option. This camera option can be useful if you do not plan on post production editing. To use this setting just go to your camera’s menu and select the Black & White or Monochrome setting and start shooting pictures. The big con is if you do decide to later edit the pictures you can but you will have much less flexibility with the editing options.

There is, however, another B&W option and in my opinion a better option. That option is to shoot your pictures in RAW format and convert them to B&W using Adobe® Photoshop, Apple’s Aperture, or your favorite photo editing software. I personally like, and use, the Aperture add-on Silver Efex Pro by NIK (the add-on is also available for Adobe® Photoshop Win & Mac). This software allows you to convert your color images to black & white with minimal effort. There are multiple choices for post-production image editing including: Neutral Exposure, Underexposure, Overexposure, High Structure, Pull Process N -1, Push Process N +1, Push Process N +2, Push Process N +3, High Contrast Red Filter, High Contrast Orange Filter, High Contrast Yellow Filter, High Contrast Green Filter, Full Spectrum, Full Spectrum Inverse, Dark Sepia, Soft Sepia, Ambrotype, Cyanotype, Tin Type, Infrared Film Normal, Infrared Film Soft, Soft Skin, Wet Rocks, Darken Contrast Vignette, Antique Plate I, Antique Plate II, Antique Solarization, Holga, and Pinhole. You can also simulate your favorite film type, and adjust brightness, contrast, and structure. There is also a ton of other options and settings within the Silver Efex Pro add-on. Apple’s Aperture, Adobe® Photoshop, and other photo editing software also have built in ways to convert your color images to black & white. If you would like to know more about Silver Efex Pro or any or any of the other fine software and add-ons NIK produces please check out NIK’s web site www.niksoftware.com.

On a quick side note, if you want to shoot infrared photography, there are companies that are now modifying DSLR cameras to be able to shoot infrared exclusively. If you are wondering why you cannot take infrared without a camera modification … it is because most camera manufacturers build their image sensors to block infrared light.

Well, I hope this has given you a jumping off point to go out and take your own B&W photos. Again remember that this is just my opinion and that there are many different ways to take or convert your own pictures to black and white.

April 27, 2009

How To Know When To Use AutoFocus Or When To Manual Focus

So you are not quite sure when manual focusing would be a better choice than letting the camera do the work for you? Well hopefully by the end of this blog post you will know what to use and when to use it.

First off, how does auto focus work? I am glad you asked! Auto focus
systems rely on one or more sensors to determine correct focus. Most of the modern DSLR cameras use a through-the-lens optical auto focus sensor that also have a built in light meter. Most DSLR cameras have at least 3 of these sensors which the camera or the user can select. The speed and accuracy of through-the-lens optical auto focusing is now often more precise than what can be achieved manually with an ordinary viewfinder.

The problem arises when the camera's sensors cannot get enough light or when the depth-off-field is too shallow or when the camera cannot keep up with the action So what might some of these situations be?
  1. Macro Photography
  2. Portraits
  3. Low Light Photography
  4. Action Shots
  5. Shooting Pictures Through Glass or Fences/Screen
Macro Photography
When shooting macro photography (extreme close-ups) most SLR/DSLR cameras have a very hard time finding the correct focus point due to the very shallow depth-of -field. If you try to shoot macro photography using auto focus you would find that the camera would struggle whiring back and forth trying to find a point of focus. When I shoot macro I exclusively manual focus my camera.

Portraits
When shooting portraits focus needs to be spot on. Most portrait shots require having the subjects eyes in perfect focus and manual focusing will allow you to dial in that focus point.

Low Light Photography
Cameras have a very hard time focusing in low light situations due to the lack of light entering the camera's sensor(s).
You’ll know when your camera is struggling using auto focus when every time you go to take a shot the lens will whirl from one end of it’s focusing options to the other and back again before deciding on where to focus.

Action Shots
When shooting fast moving objects your cameras auto focus mode might get confused, even if you are using the continuous focus setting. The best way around this is to use manual focus
and prefocus on a point that the subject will move through - and shoot at that point.

Shooting Pictures Through Glass or Fences/Screens
When shooting through something that may seem like they may not interfere don't be so sure. When using auto focus the camera may want to focus on the nearer point be it glass, fencing, or a screen. To keep the camera from focusing on these items and to be able to get that candid shot use manual focus. It will
allow you to tell the camera exactly what you want to be in focus and what you want to be blurred.

April 20, 2009

Bokeh ... What Is It And How Do You Pronounce It?

I believe that bokeh is best explained in the words of Mike Johnston so please read on.

Bokeh in Pictures

I first learned about "bo-ke" or boke in 1995, from Carl Weese, who learned about it from our mutual friend the oracular and extreme Oren Grad, who holds eight Master's degrees, three Ph.D.s, and an M.D., and who evidently taught himself Japanese so he could read Japanese photo magazines. (Perhaps I exaggerate these facts, but only slightly.) I then commissioned and published three articles about it in the March/April 1997 issue of Photo Techniques back when I was editor — one each by John Kennerdell, who is an American ex-pat living in Bangkok, Oren himself, and Harold Merklinger, a high-ranking research scientist in the Canadian defense establishment. It's one of the few issues of that magazine that sold out. My own contribution was...er, a letter. I decided that people too readily mispronounced "boke," so I added an "h" to the word in our articles, and voilá, "bokeh" was born. A Google search for the word "bokeh" just now resulted in approximately 13,300 hits. Seems the idea's gotten around.

Actually, to be precise, what I had noticed was not just that people mispronounced the word as it was commonly spelled, but that they had a tendency to ridicule it, making lame jokes about it as if it rhymed with "smoke" or "toke" or "joke." Actually, even spelled boke, it is properly pronounced with bo as in bone and ke as in Kenneth, with equal stress on either syllable. It is a Japanese word meaning, roughly, "fuzzy," and it is used to describe old people with cobwebs in their heads among several other things — including the out-of-focus areas of photographs, which, I'm told, might more specifically be referred to as "boke-aji."

One of the curious aspects of the phenomenon for me was that some people then, and some even now, respond to the idea scornfully or even angrily. Is this some sort of insistence on conformity, as if you are supposed to look at certain parts of pictures and not others? I never did know, and I probably never will. (But then, there are a lot of things about my native culture that I will just never understand — for instance, rubber suits as erotic accessories, or why it would occur to anyone to hate black people. What's up with that, anyway? I mean, I certainly know that race hatred exists — I just haven't got the faintest idea why).

Now, I have to admit that I got somewhat obsessed with bokeh after I finally became aware of it. It interested me, in particular, that different lenses render blur in different ways. Even knowing that I take things a bit too far, though, it always seemed strange to me that there are people who don't think it's valid to look at the blurry parts of pictures.


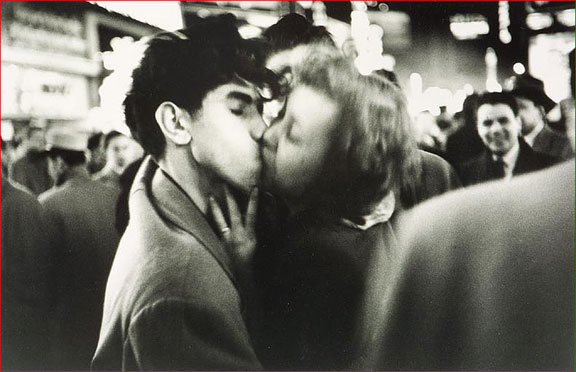
Take this picture by Tony Rowlett, for example. It was made with a Leica Noctilux at a fairly wide aperture. I don't think it's possible to look at this and not get interested in what's going on in the out of focus areas, do you? If you really look at it, there are some pretty amazing abstracted shapes and tones. Does anyone really look at a picture like this and completely ignore all the blurry parts? I doubt it.

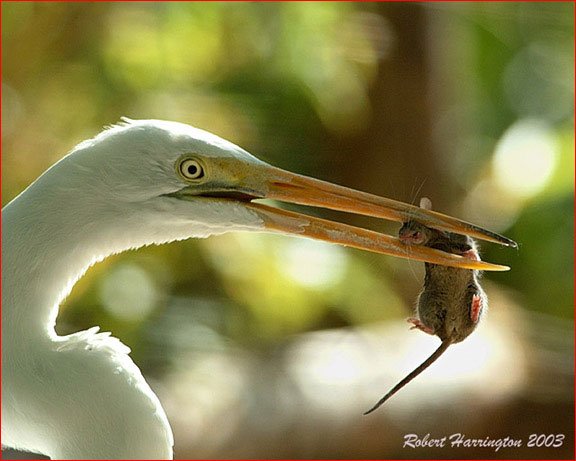
The most obvious way bokeh gets into pictures, of course, is simply as background. In Robert Harrington's cruel but beautiful picture here, for instance, most of the area of the picture is occupied by bokeh, even though it has nothing to do with the subject of the picture. The picture might be as good with a plain white or black background. Still, if you just look at the bokeh as it exists, it's hard to deny that the color and brightness of the out of focus parts contribute to the sense of a certain kind of light, and the feeling of the outdoors.


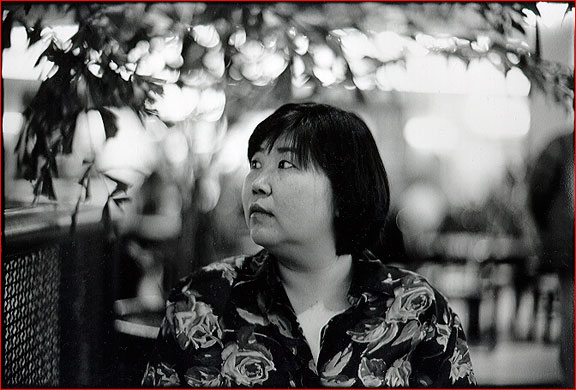
Here's a street shot by the excellent '50s photographer Dan Weiner, who has always been one of my favorites. It shows that motion blur can blend with bokeh in interesting ways. (It also shows just how little sharpness really matters in some pictures.)

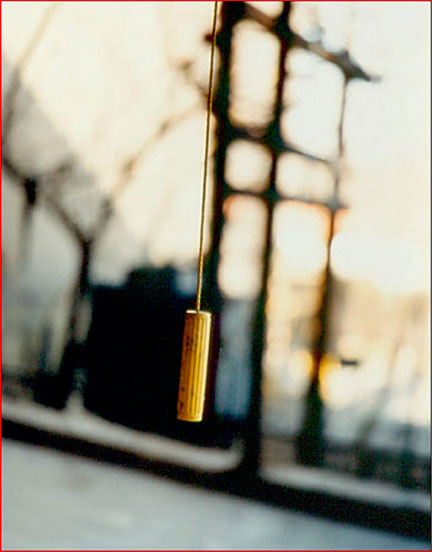
Some artists go ahead and use bokeh as an integral part of their subject matter. Kim Kirkpatrick made deft use of it as design, as figuration, and as a way to use color abstractly in a large body of work he made over five or six or so years in the '80s and '90s.

Fear Not

It's true that some photographers seldom or never take pictures in which anything is not sharp. For them, bokeh is not much of an issue when they're working, although it's still pertinent when they're looking at other peoples' pictures. For the rest of us, well, there's nothing to be scared of. It's just another arrow in the creative quiver. ~ Mike Johnston

April 13, 2009

What Is White Balance

White balance (WB) is the process of removing unrealistic color casts, so that objects which appear white in person are rendered white in your photograph. To get your camera to properly display white, as it was seen in person, you must take into account the "color temperature" of a light source. Color temperature refers to the relative warmth or coolness of the white light. Our eyes are quite good at judging what is white under different light sources, however, digital cameras often have difficulty in judging this using the auto white balance setting (AWB). Improperly set WB can create unsightly color casts which are unrealistic. To adjust white balance in traditional film photography required using different cast removing filters, which had to be attached to the lens, for each lighting condition. Digital cameras do not require these filters. Understanding WB can help you avoid color casts that are created by you camera's AWB which will help you improve your photos under a wide range of lighting conditions.

To understand WB requires understanding a little bit about color temperature. Color temperature describes the spectrum of light which is radiated from a "blackbody" with that surface temperature. A "blackbody" is an object which absorbs incident light, neither reflecting it or allowing it to pass through. In simpler terms, think of a piece of metal being heated up. You can heat that metal to become "red hot" and for even higher temperatures it can be heated to be "white hot". In the same instance, "blackbodies" at differing temperatures also have varying color temperatures of "white light". Click here to view a chart of color temperatures of some common light sources.

If you shoot in RAW file format-
RAW is the best, by far, solution to getting the proper white balance. RAW, unlike other file formats, allow you to set the white balance after the photo has been taken using photo editing software.

If you shoot in JPEG or TIFF format-
Most digital cameras, now-a-days, contain a variety of preset white balances. These presets are a good place to start if you have a DSLR camera and work quite well if you are using a point and shoot that has no further adjustments. The best way to set white balance, however, is to use a "18% gray card" and set that as a custom white balance setting. Please refer to your owners manual to see how to set a custom white balance for your camera.

Of course this is just the simplified version of White Balance so to find out more and in more detail please try searching the internet for White Balance. There are many good resources in print and on the internet.


April 6, 2009

Manual Mode

So you have mastered Aperture Priority mode, Shutter Priority mode, and you know how to properly select your ISO for the lighting ... Well, now you are ready to step into the world of full Manual mode!

The short...
You will need to use what you learned about shutter speed, and what you learned about aperture settings and how they affect DOF (depth of field). You will also need to learn how to read and use the light meter that is built into your camera to select the proper ISO, shutter speed, and aperture.

The long...

Shutter
The shutter is the hole that allows light to enter your camera. If it is held open for a long time lots of light gets through the hole - if it is held open for a short amount of time less light gets through the hole. We discussed this, in depth, in the Shutter Priority mode blog entry. Basically, having a fast shutter speed will allow you to freeze fast action such as sporting events, splashing water, racing, and so forth. There is, however, a drawback to using a fast shutter speed. The faster the shutter speed the less light enters the camera. Conversely, you might want to use a slow shutter speed to compensate for low light situations because the longer the shutter is held open the more light enters the camera. Unfortunately, there is also a drawback to using a short shutter speed. The slow shutter speed is more likely to cause motion blur if you or the subject move while the shutter is open.

In Auto Mode, Program Mode, and Aperture Mode the camera decides what shutter speed is needed. Sometimes the result is what and sometimes it is not because the camera does not know if you want to freeze fast motion or capture a low light portrait. The only thing the camera knows is whether the correct amount of light is entering the camera to produce a proper exposure. However, with the camera in Manual Mode you control the shutter speed to get the shot you want.

Aperture
Although the aperture does open and close which affects the amount of light entering the camera, the main purpose of the aperture is to control the depth of field. Again, the larger the aperture is open the more light gets in and the smaller the the aperture the less light enters. Also the larger the aperture opening the shallower the DOF and the smaller the aperture opening the deeper the depth of field is. To read more about the setting the aperture read the Aperture Priority Mode blog entry.

In Auto Mode, Program Mode, and Shutter Priority Mode the camera decides the aperture setting. The camera only knows how to get a properly exposed photo so with the camera in Manual Mode you can control the aperture setting.

ISO
In Auto Mode ISO is automatically selected for you, but in Aperture, Shutter, and Manual Modes you must select the ISO setting of your camera. ISO is what sets the sensitivity to light of your camera. The higher the ISO the more sensitive the camera is to light which in turn allows you to shoot pictures in lower light situations. To read more see the ISO blog entry.

So to sum it all up Manual Mode puts you in complete control of your camera from the shutter speed to the aperture setting to the ISO setting you get to choose how your picture turns out. My only suggestion is if you have not yet tried out Aperture Priority Mode and Shutter Priority Mode you should try those out first to get a feel for setting the aperture or the shutter. Again this is an advanced mode and you should learn how to properly use the features of you camera before using this setting to produce pictures. This is not what I consider a "safe" setting. Please practice with this setting before using it to take important pictures. Other than that go out and give Manual mode a try!


March 30, 2009

Shutter Priority Mode

So you've tried Program Mode and Aperture Mode, now you are wondering what Shutter Priority Mode is good for. Well, you are in luck! Because that is what this weeks post is all about. Just in case you don't know this is part three in a four part discussion on advanced camera modes. Alright, lets get started.

Shutter Priority mode will allow you to set the speed of your shutter. So what's the difference between adjusting the aperture and adjusting the shutter? Well the aperture and the shutter do essentially the same function ... they both control or regulate the amount of light reaching the sensor or film when you take a picture. However, the aperture and shutter controls affect a photo in very different ways. The aperture, as we know, adjusts the depth of field while the shutter speed makes a picture sharp or blurry depending on the length of time the shutter is open.

To select the Shutter Priority mode turn the command dial to either "S" or "Tv (meaning "time value")" depending on your model of camera. If your camera does not have a command dial you may be able to select Shutter Priority mode by entering the on camera menu. By selecting this option you will be choosing the shutter speed and the camera will automatically adjust the aperture to properly expose your photo.

So why would you want to adjust the shutter speed? Well, the main reason most people adjust shutter speed is to stop or to show action. A high shutter speed of 1/1000 of a second or higher will stop action and allow you to get a great clear shot of the action. Just remember that as you increase shutter speed you may have to increase your ISO to get a properly exposed photo. Alternately a slow shutter speed of 1/30 of a second or slower will allow the action to blur so that you can show action or movement. Because nothing says "That was really flying by!" like some motion blur. So go out and stop some action using Shutter Priority mode.

March 23, 2009

Aperture Priority Mode

This is part two in a four part discussion on advanced camera modes.  We will continue to discuss other modes in later posts but this post will deal with aperture priority ... so now its time to get brave and rotate that dial away from the Auto setting and learn how to use the Aperture Priority (A or Av) setting.   

Lets start off with the basics.  Aperture Priority mode lets you select the size of the camera's aperture.  The aperture is the opening that controls how much light reaches the sensor or film at the moment of exposure.  Unfortunately, for most of us, aperture settings are quite hard to understand.  Contrary to what would make sense, the smaller the aperture number the larger the aperture is open and the larger the aperture number the smaller the aperture is open.  There is a reason for this backward looking numbering.   The lens aperture is usually specified as an ƒ number, the ratio of the focal length to effective aperture diameter.  The term "one ƒ-stop" refers to a factor of √2, which is approximately 1.41, change in ƒ-number which in turn corresponds to a factor of 2 change in light intensity.  Wow! Was that way too much mathematical information?  I think so!  So here is the deal … The larger the aperture is open the more light is let through the shutter so you can take pictures in lower light situations.  Unfortunately, and sometimes fortunately, the larger the aperture is open the shorter the depth of field is.  I have supplied some pictures to demonstrate this.

As you may be able to tell, the picture to the left has been shot using a larger aperture opening (ƒ/5 to be exact) and the picture to the right has been shot using a small aperture opening (ƒ/32 to be exact).  Notice how the depth of field changes the smaller you go with the aperture setting.

So what does all of this mean to you?  Well it means that you can set your camera to Aperture Priority mode set your aperture opening and take pictures.  This is a fairly safe way to take pictures, because the camera is still doing half of the work by selecting the correct shutter speed for the ƒ-stop selected.  The best way to get used to using Aperture Priority mode is to experiment with it on a day when you don't need to worry about taking great pictures.  Practice taking pictures with different aperture settings and see how they turn out.  It wont take you too long to figure out how to make the aperture work for you.

March 16, 2009

Program Mode

Is your DSLR stuck in Auto Mode? Would you like to be able to get more out or your camera? We all know that command dial on the top of our cameras ... most of them have all those great automatic modes like landscape, portrait, sports, and so on. But what are those modes that are just letters? Things like P, S, A, and M or maybe P, Tv, Av, and M ... These are the advanced modes of Program, Shutter Priority, Aperture Priority, and Manual. This is part one of a four part post dealing with the advanced shooting modes on DSLR cameras and the modes that exist on some advanced compact cameras. This particular post will deal with the Program Mode and in other posts to come will deal with the other modes. So lets get started!


Program Mode - If you have only used Auto Mode on your camera, Program Mode is a good place to start. On most cameras Program Mode is selected by moving the Mode or Command Dial to the (P) setting. A lot like Auto Mode, Program Mode still selects the appropriate aperture and shutter speed, so you have no worries about not having a correctly exposed picture. So why use this setting? Well, when using Program Mode, your camera will now unlock some settings that you previously had no control over. These settings vary depending on the camera make and model you own. Some of these settings may be the ability to change the ISO (discussed in a previous blog entry), to change the white balance (which will be discussed in a later blog entry), be able to shoot continuous and self timer modes (the ability to shoot fast bursts of pictures and to be able to push the shutter release button and run to get in the picture), and be able to use exposure compensation (this allows you to adjust the exposure up and down to achieve the proper exposure).


The main advantage to using Program Mode is that it is great for easily getting a great photograph without having to think too hard about settings. But you will now gain some control over advanced settings in your camera. So now go out and give it a try and be sure to check in next week to find out about Aperture Priority Mode.

March 9, 2009

What Is ISO And How Does It Affect My Pictures

The International Organization for Standardization or "ISO" defines both an arithmetic scale and logarithmic scale for measuring color-negative film speed. Although, in digital camera systems there is an arbitrary relationship between exposure and sensor data values which can be achieved by setting the signal gain of the sensor. So what does that mean for you? Well, ISO is the measurement of the speed of film or how sensitive it is to light. A low ISO film is not very sensitive to light and the higher the ISO rating the more sensitive to light the film is but there is a trade off. The higher you go with the ISO rating the larger the film grain which means that more grain will be seen in the final product. When using a film camera, it is typical to shoot with a low ISO film (ISO 100 or ISO 200) for photography in normal daylight or for portraiture in a properly lit studio (due to the lack of visible grain in the finished product). ISO 400 film is typically used in lower light situations, such as, well lit indoor pictures. ISO 800 and ISO 1600 films are available for photography in very low light situations.
"Here's the secret that governs film speed: Doubling the ISO number of the film doubles its sensitivity to light. So ISO 200 film needs half the light to take the same picture as ISO 100 film. ISO 400 film needs a quarter of the light that ISO 100 needs. In other words, you could capture a low-light scene with a shutter speed of 1/15 second with ISO 100 film, or 1/60 second with ISO 400. That's an incredibly powerful capability that means the difference between getting a blurry mess and a sharp photo." ~ Dave Johnson

Who cares, right? ... I mean we are dealing with a digital camera world. You can't put film in a DSLR! No, but we are able to adjust the ISO of our digital cameras. Which means that by controlling the ISO adjustment on our digital camera we are mimicking loading different speed film into our cameras.


My digital camera shoots at ISO 3200 so I will just set it to that and shoot away. Well, that statement is not necessarily right. There is a down side to shooting at high ISO settings on a digital camera. The big one is that the higher you go with the ISO setting the more "noise" will be visible on the picture. You should always shoot at the lowest possible ISO setting at all times. In most normal conditions, stick with the cameras lowest ISO setting, since that will provide you with a picture with the least amount of digital noise. But when you notice the camera recommending a very low shutter speed (less than about 1/30 of a second for handheld shots) it is time to raise the ISO. Just remember that when you are done shooting at the higher ISO speed to lower it back down so your camera is ready for the next time you use it. To reiterate, do not be afraid to use a higher ISO setting just remember that the higher you go the more noise you are going to see on the picture.

March 2, 2009

Shooting Photographs With Feeling

One of the most important keys to shooting great photographs is to shoot with feeling. By feeling I mean think about the subject of your picture and think about what you want to portray. What you are trying to accomplish is to give your audience the same feeling you had while taking the photo. If the picture is of a person you also want to try to show what the person was feeling. Here is an article written by Rick Sammon to help explain what I am trying to convey.
"I used to teach piano, specializing in jazz improvisation. (Many photographers, including Ansel Adams and Gordon Parks, were/are musicians. Many musicians, including Graham Nash, are also avid photographers.)  I’d like to share with my fellow photographers some of the conversations I had with my first-time piano students – which actually have something in common with my photo workshops students. Here we go!

Student: "Rick, do you think I should use a blues scale for my solo . . . or do you think maybe playing in fourths [very open sound] would be better?"
Rick Sammon: "It does not matter what notes you play, it matters how you play them."
Student: “Uh . . . that really helps me, Rick. Okay, do you think my solo would sound better on a Hammond B-3 organ or a Fender Rhodes electric piano or a Yamaha grand?"
Rick Sammon: "Personally, I like the organ . . . and the piano . . . and the synthesizer . . . and the grand piano.  But have you ever considered the accordion? Billy Joel uses it, and so does Toots Thielemans."

Getting a bit agitated at this point, the student says, "Fine, you are a big $#%! help. I'm not taking lessons from someone who can't teach me anything. I'm out of here."  Smiling, hoping that I can keep the student, who I really want to help because I truly enjoy teaching, I say, "Before you go, I'd like to give you some free advice, if I may."

Student: "What's that, maestro?" 
Rick Sammon: "Don't think so technical, although technique is important. When you play, play with feeling. Play with passion. Above all . . . play for yourself."

Reactions to my comments varied, from a big smile to eyes filling up with tears.

In case you were wondering, I did keep all my students. (I've had participants on my photo workshops get emotional in portfolio reviews on more than on occasion. That's very understandable. I know how important photography is to each and every person.)"  ~ Rick Sammon
As you can see from the article above ... photography, much like music, is about feeling and passion. So go have fun shooting pictures and just remember to shoot them with feeling.

February 23, 2009

The Difference Between A Full Frame Sensor And An APS-C "Crop" Sensor DSLR Camera

What exactly is a crop sensor camera? Well, a full frame 35mm camera (film or digital) takes a picture that is around 36mm x 24mm in size. When digital sensors were first introduced it was not possible to make a digital sensor that large in any quantity. The ones that could be made were so expensive that no one would have been able to afford a camera that used one. Camera makers decided to make a smaller sensor that was around 15mm x 22.5mm which just happened to be close to the image size of the (short-lived) APS film format. The reason that we call them "crop" is because if you take a full frame image and crop the center 15mm x 22.5mm out of it you get an imager the size or the "crop" sensor.

So what does all of this technical mumbo-jumbo mean for the average photographer? Not a whole lot! For the average user a "crop" sensor camera will provide you with just as high quality pictures as a full format camera, just put your kit lens on it and enjoy shooting pictures. For people that want to learn more read on. Other than the obvious difference in image size the only other difference between the two sensors is the angle of view. Because the APS-C sensor is smaller is has a smaller angle of view than the full frame sensor has. This smaller angle of view creates a something called a "digital multiplier". The digital multiplier is 1.6x for Canon EOS DSLR cameras and 1.5x for Nikon, Pentax, and Sony DSLR cameras. This digital multiplier can work in you favor or it can work against you if you don't understand it. So all this to tell you that if you need a wide angle lens of around 16mm on a full frame camera you will need around a 10mm lens on an APS-C sensor camera to achieve that same wide angle. However, if you need a zoom of around 450mm you only need to buy a 300mm lens for the APS-C sensor camera. So to put it simply...

For Canon EOS cameras:
  • APS-C sensor focal length to equal field of view of full frame focal length you multiply by 1.6
  • Full frame focal length to equal field of view for APS-C sensor you divide by 1.6
For Nikon, Pentax, and Sony cameras:
  • APS-C sensor focal length to equal field of view of full frame focal length you multiply by 1.5
  • Full frame focal length to equal field of view for APS-C sensor you divide by 1.5
Also note that the aperture stays constant because there is no digital multiplier for lens speed. To find out more information on this topic including more technical data than you can throw a stick at please visit www.bobatkins.com.

February 20, 2009

Your Most Important Piece Of Equipment... And It Isn't In Your Camera Bag!

Here is a short story to start off this post. This story is from Adorama.com


"One of the most successful photographers of the 20th century, Henri Cartier-Bresson, had a single camera--a Leica rangefinder--and a 50mm lens. He didn't even have a light meter. He shot black-and-white film, hand-holding for every frame. He stopped every 36 exposures to rewind and reload. He had to wait until that night or the next day, or perhaps longer, to process the negatives, make contact sheets and study them with a Magnifying loupe to see the results. And with that simple set-up, he built a body of work that would influence generations of photographers and help to define photojournalism."  ~ Mason Resnick


With that being said... Nowadays, cameras offer many, many sophisticated options. Artificial intelligence-based metering, auto exposure and autofocus, super long zoom lenses, and super fast burst rates just to name a few. But with all these technical innovations we still forget to use the most important piece of equipment, our brains. The camera companies have yet to create a camera that can compose a shot, or see how colors, light, and shape interact, but unfortunately we still seem to rely on the camera, itself, to create a great shot. Unfortunately, the camera is only capable of making a correct exposure. So it is still up to our brains to modify the exposure to fit the mood of the picture, or to find the proper placement of the camera to produce the proper shot, or to decide what to leave in or remove from the frame.


So as you can see, just like Henri Cartier-Bresson, we need to use our brains to create the next great shot. So it doesn't matter if you are using the latest top-of-the-line DSLR, a compact, or a film camera don't forget to use your most important piece of equipment ... your brain.

January 31, 2009

Why You Should Own A Prime Lens

What is a prime lens?  A prime lens, according to Wikipedia, "is either a photographic lens whose focal length is fixed, as opposed to a zoom lens, or it is the primary lens in combination lens system".  In essence, a prime lens has no zooming capabilities it is only able to be focused.  Prime lenses are great for many different applications.  They can be used for portraiture, macro photography, sporting events, etc.  Prime lenses range from around the 10 mm area to well above 200 mm.  So you will be able to find a prime lens to suit your needs.

So now you are asking "Why should I own one?".  Well if you are really into photography there are many reasons to own a prime lens but here are five reasons to get you started.  1. They are fun.  2. They are nostalgic,  all of the original cameras came with nothing but prime lenses.  3. They have razor sharp focus.  4. They usually have large apertures somewhere around ƒ/1.4 or larger.  So now you can take great pictures in low light without using a flash.  5. They are relatively inexpensive starting at around $150.00.  So go out and get one of these great prime lenses and get to shooting.

January 27, 2009

How To Help Keep Your DSLR's Sensor Free From Dust

  1. When changing your lens try to do so with the camera pointed down or away from the wind.
  2. When using a zoom lens try to zoom in and out slowly to help reduce the risk of the lens causing suction and pulling dust into the camera body through the lens.
  3. When shooting in dusty or windy conditions, such as the beach, try wrapping the camera body in a plastic bag to help keep out dust and sand.
  4. If you must change a lens out in the field, while shooting outdoor photography, try to do so in a somewhat sheltered place such as a bus stop, a building, or in your car.
  5. Be sure to turn your camera off before changing lenses, this helps reduce the risk of dust particles being electrically attracted and sticking to the sensor.
  6. Try to be prepared, when changing your lens try to have your lens "ready to go" to avoid extended periods of time with nothing protecting the camera body.
  7. The best way to keep your sensor clean is to just pick a lens and stick with it but if you can't these tips will help you keep your sensor clean.

January 22, 2009

HDR Photography

High Dynamic Range photography, herein referred to as HDR, is a set of techniques that allows a greater dynamic range of luminances between light and dark areas of a scene than normal digital imaging techniques. The intention of HDR is to accurately represent the wide range of intensity levels found in real scenes ranging from direct sunlight to shadows.  Basically, HDR photography is a set of multiple images "layered" together using a computer program to show the full range of light and dark areas in the photo.

What you need to produce an HDRI or High Dynamic Range Image is a  digital camera with AEB aka Auto Exposure Bracketing (on a Nikon it is referred to as just "Bracketing") or the ability to shoot RAW format and a RAW editor such as Aperture, Adobe® Photoshop, or RAWShooter.  Also needed is an HDR Program such as Photomatix or Adobe® Bridge.  The difference between the these two programs is the fact that Photomatix is a "stand alone" program specifically created for the purpose of creating HDR photographs.  Adobe® Bridge, on the other hand, has many options.  One of those options includes merging multiple images to create an HDR photograph in Adobe® Photoshop the image must then be shrunk from 32 bit to 8 bit for editing.  None of the programs I have found have been exceptionally easy to use or very straight forward. However, if you are computer savvy or if you do not mind reading the "how to" that comes with the different programs it is not too awfully hard to figure out how to create beautiful HDR photographs. 

Okay, here is the simplest explanation of how to create a HDRI.  First, take one RAW picture or take, at least, three "bracketed" pictures (bracketing should be set up to be separated by at least one full stop).  If you choose the one RAW image you will need to create two more versions of the picture using Aperture or Photoshop.  One of the versions needs to be underexposed and one needs to be overexposed.  If you choose to go the way of bracketing you will also need and overexposed, an underexposed, and a properly exposed photo.  What is great about using the bracketed photos is the ability to load the bracketed images straight into the HDR creation software.  Once the pictures have been loaded into the creation software, let the software render the image and you now have a beautiful HDR photograph.

For more information there are many websites that come up doing a Google search for HDR photography, but here is a link to a page with tons of great information and samples of beautiful HDR photographs www.vanilladays.com.

January 21, 2009

The First Post and A Bit About The Blog

A bit about me... the author.  I have been a photographer for years and have used film SLR's as well as Digital SLR cameras.  I have almost completely switched over to digital except for landscapes.  I still believe that nothing, as of yet, can reproduce a landscape better than an medium format film camera.  Not too long ago I decided to become a full time freelance photographer.  I own my own business in South Carolina and also have my own website, where some of my pictures may be ordered.  

I am a dedicated Nikon man but have nothing against anyone who uses Canon or any of the other fine brands of cameras that are on the market.  I also know that even though Nikon may not be on the cutting edge of technology they are not very far behind.  The cameras that Nikon builds are also much more durable than other brands and seem to stand up to the punishment I dole out on them.  All that to say, I have nothing against other brands of cameras but my posts may be biased toward Nikon.  

This blog is open to responses to my posts but please do not use your posts to argue or be degrading about anything because that is not what this blog is about.  This blog is however about camera tips, tricks, and shooting styles.  If you feel like any post I have posted is not correct or if you have differing views please feel free to post, but just remember to keep your posts clean or they will be deleted.  Also, if you have any questions please feel free to ask them and I will do my best to answer.  Just remember that nobody knows every thing about photography so if I don't know the answer I will do my best to find the answer.

So lets get started having fun and shooting pictures together,

Jacob