April 27, 2009

How To Know When To Use AutoFocus Or When To Manual Focus

So you are not quite sure when manual focusing would be a better choice than letting the camera do the work for you? Well hopefully by the end of this blog post you will know what to use and when to use it.

First off, how does auto focus work? I am glad you asked! Auto focus
systems rely on one or more sensors to determine correct focus. Most of the modern DSLR cameras use a through-the-lens optical auto focus sensor that also have a built in light meter. Most DSLR cameras have at least 3 of these sensors which the camera or the user can select. The speed and accuracy of through-the-lens optical auto focusing is now often more precise than what can be achieved manually with an ordinary viewfinder.

The problem arises when the camera's sensors cannot get enough light or when the depth-off-field is too shallow or when the camera cannot keep up with the action So what might some of these situations be?
  1. Macro Photography
  2. Portraits
  3. Low Light Photography
  4. Action Shots
  5. Shooting Pictures Through Glass or Fences/Screen
Macro Photography
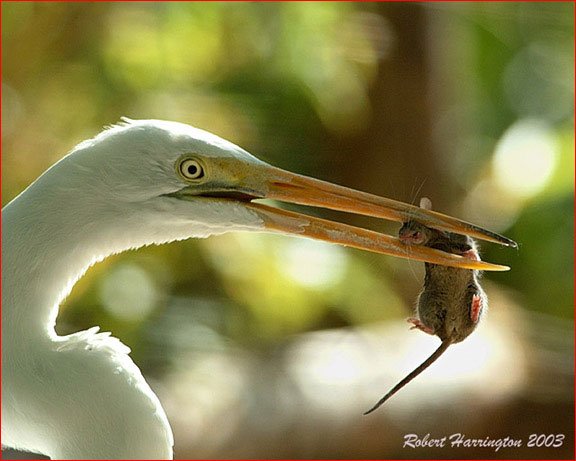
When shooting macro photography (extreme close-ups) most SLR/DSLR cameras have a very hard time finding the correct focus point due to the very shallow depth-of -field. If you try to shoot macro photography using auto focus you would find that the camera would struggle whiring back and forth trying to find a point of focus. When I shoot macro I exclusively manual focus my camera.
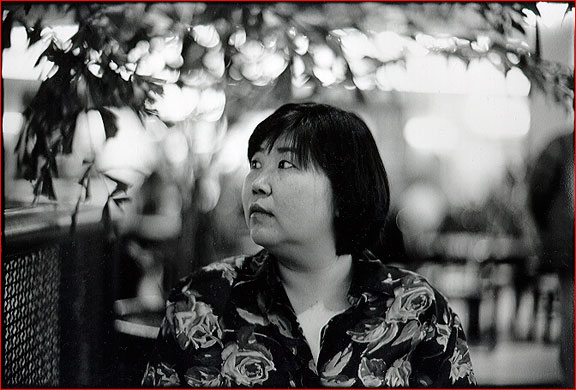
Portraits
When shooting portraits focus needs to be spot on. Most portrait shots require having the subjects eyes in perfect focus and manual focusing will allow you to dial in that focus point.

Low Light Photography
Cameras have a very hard time focusing in low light situations due to the lack of light entering the camera's sensor(s).
You’ll know when your camera is struggling using auto focus when every time you go to take a shot the lens will whirl from one end of it’s focusing options to the other and back again before deciding on where to focus.
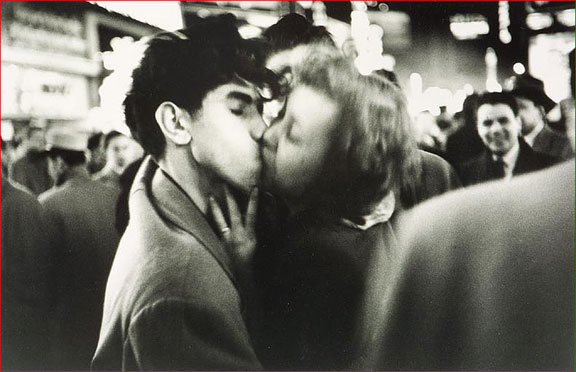
Action Shots
When shooting fast moving objects your cameras auto focus mode might get confused, even if you are using the continuous focus setting. The best way around this is to use manual focus
and prefocus on a point that the subject will move through - and shoot at that point.

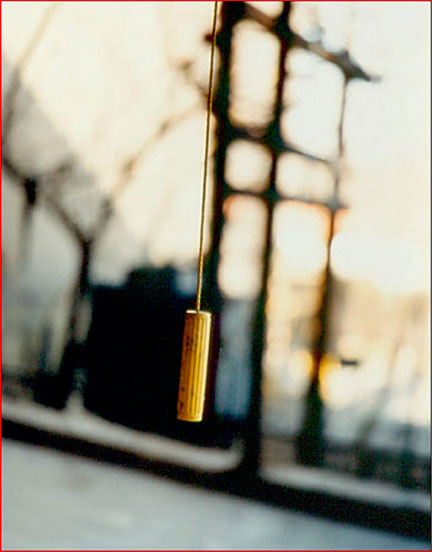
Shooting Pictures Through Glass or Fences/Screens
When shooting through something that may seem like they may not interfere don't be so sure. When using auto focus the camera may want to focus on the nearer point be it glass, fencing, or a screen. To keep the camera from focusing on these items and to be able to get that candid shot use manual focus. It will
allow you to tell the camera exactly what you want to be in focus and what you want to be blurred.

April 20, 2009

Bokeh ... What Is It And How Do You Pronounce It?

I believe that bokeh is best explained in the words of Mike Johnston so please read on.

Bokeh in Pictures

I first learned about "bo-ke" or boke in 1995, from Carl Weese, who learned about it from our mutual friend the oracular and extreme Oren Grad, who holds eight Master's degrees, three Ph.D.s, and an M.D., and who evidently taught himself Japanese so he could read Japanese photo magazines. (Perhaps I exaggerate these facts, but only slightly.) I then commissioned and published three articles about it in the March/April 1997 issue of Photo Techniques back when I was editor — one each by John Kennerdell, who is an American ex-pat living in Bangkok, Oren himself, and Harold Merklinger, a high-ranking research scientist in the Canadian defense establishment. It's one of the few issues of that magazine that sold out. My own contribution was...er, a letter. I decided that people too readily mispronounced "boke," so I added an "h" to the word in our articles, and voilá, "bokeh" was born. A Google search for the word "bokeh" just now resulted in approximately 13,300 hits. Seems the idea's gotten around.

Actually, to be precise, what I had noticed was not just that people mispronounced the word as it was commonly spelled, but that they had a tendency to ridicule it, making lame jokes about it as if it rhymed with "smoke" or "toke" or "joke." Actually, even spelled boke, it is properly pronounced with bo as in bone and ke as in Kenneth, with equal stress on either syllable. It is a Japanese word meaning, roughly, "fuzzy," and it is used to describe old people with cobwebs in their heads among several other things — including the out-of-focus areas of photographs, which, I'm told, might more specifically be referred to as "boke-aji."

One of the curious aspects of the phenomenon for me was that some people then, and some even now, respond to the idea scornfully or even angrily. Is this some sort of insistence on conformity, as if you are supposed to look at certain parts of pictures and not others? I never did know, and I probably never will. (But then, there are a lot of things about my native culture that I will just never understand — for instance, rubber suits as erotic accessories, or why it would occur to anyone to hate black people. What's up with that, anyway? I mean, I certainly know that race hatred exists — I just haven't got the faintest idea why).

Now, I have to admit that I got somewhat obsessed with bokeh after I finally became aware of it. It interested me, in particular, that different lenses render blur in different ways. Even knowing that I take things a bit too far, though, it always seemed strange to me that there are people who don't think it's valid to look at the blurry parts of pictures.


Take this picture by Tony Rowlett, for example. It was made with a Leica Noctilux at a fairly wide aperture. I don't think it's possible to look at this and not get interested in what's going on in the out of focus areas, do you? If you really look at it, there are some pretty amazing abstracted shapes and tones. Does anyone really look at a picture like this and completely ignore all the blurry parts? I doubt it.

The most obvious way bokeh gets into pictures, of course, is simply as background. In Robert Harrington's cruel but beautiful picture here, for instance, most of the area of the picture is occupied by bokeh, even though it has nothing to do with the subject of the picture. The picture might be as good with a plain white or black background. Still, if you just look at the bokeh as it exists, it's hard to deny that the color and brightness of the out of focus parts contribute to the sense of a certain kind of light, and the feeling of the outdoors.


Here's a street shot by the excellent '50s photographer Dan Weiner, who has always been one of my favorites. It shows that motion blur can blend with bokeh in interesting ways. (It also shows just how little sharpness really matters in some pictures.)

Some artists go ahead and use bokeh as an integral part of their subject matter. Kim Kirkpatrick made deft use of it as design, as figuration, and as a way to use color abstractly in a large body of work he made over five or six or so years in the '80s and '90s.

Fear Not

It's true that some photographers seldom or never take pictures in which anything is not sharp. For them, bokeh is not much of an issue when they're working, although it's still pertinent when they're looking at other peoples' pictures. For the rest of us, well, there's nothing to be scared of. It's just another arrow in the creative quiver. ~ Mike Johnston

April 13, 2009

What Is White Balance

White balance (WB) is the process of removing unrealistic color casts, so that objects which appear white in person are rendered white in your photograph. To get your camera to properly display white, as it was seen in person, you must take into account the "color temperature" of a light source. Color temperature refers to the relative warmth or coolness of the white light. Our eyes are quite good at judging what is white under different light sources, however, digital cameras often have difficulty in judging this using the auto white balance setting (AWB). Improperly set WB can create unsightly color casts which are unrealistic. To adjust white balance in traditional film photography required using different cast removing filters, which had to be attached to the lens, for each lighting condition. Digital cameras do not require these filters. Understanding WB can help you avoid color casts that are created by you camera's AWB which will help you improve your photos under a wide range of lighting conditions.

To understand WB requires understanding a little bit about color temperature. Color temperature describes the spectrum of light which is radiated from a "blackbody" with that surface temperature. A "blackbody" is an object which absorbs incident light, neither reflecting it or allowing it to pass through. In simpler terms, think of a piece of metal being heated up. You can heat that metal to become "red hot" and for even higher temperatures it can be heated to be "white hot". In the same instance, "blackbodies" at differing temperatures also have varying color temperatures of "white light". Click here to view a chart of color temperatures of some common light sources.

If you shoot in RAW file format-
RAW is the best, by far, solution to getting the proper white balance. RAW, unlike other file formats, allow you to set the white balance after the photo has been taken using photo editing software.

If you shoot in JPEG or TIFF format-
Most digital cameras, now-a-days, contain a variety of preset white balances. These presets are a good place to start if you have a DSLR camera and work quite well if you are using a point and shoot that has no further adjustments. The best way to set white balance, however, is to use a "18% gray card" and set that as a custom white balance setting. Please refer to your owners manual to see how to set a custom white balance for your camera.

Of course this is just the simplified version of White Balance so to find out more and in more detail please try searching the internet for White Balance. There are many good resources in print and on the internet.


April 6, 2009

Manual Mode

So you have mastered Aperture Priority mode, Shutter Priority mode, and you know how to properly select your ISO for the lighting ... Well, now you are ready to step into the world of full Manual mode!

The short...
You will need to use what you learned about shutter speed, and what you learned about aperture settings and how they affect DOF (depth of field). You will also need to learn how to read and use the light meter that is built into your camera to select the proper ISO, shutter speed, and aperture.

The long...

Shutter
The shutter is the hole that allows light to enter your camera. If it is held open for a long time lots of light gets through the hole - if it is held open for a short amount of time less light gets through the hole. We discussed this, in depth, in the Shutter Priority mode blog entry. Basically, having a fast shutter speed will allow you to freeze fast action such as sporting events, splashing water, racing, and so forth. There is, however, a drawback to using a fast shutter speed. The faster the shutter speed the less light enters the camera. Conversely, you might want to use a slow shutter speed to compensate for low light situations because the longer the shutter is held open the more light enters the camera. Unfortunately, there is also a drawback to using a short shutter speed. The slow shutter speed is more likely to cause motion blur if you or the subject move while the shutter is open.

In Auto Mode, Program Mode, and Aperture Mode the camera decides what shutter speed is needed. Sometimes the result is what and sometimes it is not because the camera does not know if you want to freeze fast motion or capture a low light portrait. The only thing the camera knows is whether the correct amount of light is entering the camera to produce a proper exposure. However, with the camera in Manual Mode you control the shutter speed to get the shot you want.

Aperture
Although the aperture does open and close which affects the amount of light entering the camera, the main purpose of the aperture is to control the depth of field. Again, the larger the aperture is open the more light gets in and the smaller the the aperture the less light enters. Also the larger the aperture opening the shallower the DOF and the smaller the aperture opening the deeper the depth of field is. To read more about the setting the aperture read the Aperture Priority Mode blog entry.

In Auto Mode, Program Mode, and Shutter Priority Mode the camera decides the aperture setting. The camera only knows how to get a properly exposed photo so with the camera in Manual Mode you can control the aperture setting.

ISO
In Auto Mode ISO is automatically selected for you, but in Aperture, Shutter, and Manual Modes you must select the ISO setting of your camera. ISO is what sets the sensitivity to light of your camera. The higher the ISO the more sensitive the camera is to light which in turn allows you to shoot pictures in lower light situations. To read more see the ISO blog entry.

So to sum it all up Manual Mode puts you in complete control of your camera from the shutter speed to the aperture setting to the ISO setting you get to choose how your picture turns out. My only suggestion is if you have not yet tried out Aperture Priority Mode and Shutter Priority Mode you should try those out first to get a feel for setting the aperture or the shutter. Again this is an advanced mode and you should learn how to properly use the features of you camera before using this setting to produce pictures. This is not what I consider a "safe" setting. Please practice with this setting before using it to take important pictures. Other than that go out and give Manual mode a try!