What exactly is the “Rule of Thirds”? The rule is simple to explain but for some it may be hard to put into practice. You should imagine breaking an image down into thirds, both vertically and horizontally, so that you have 9 segments like the demonstration below.
This is basically a tic-tac-toe board. Too often photographs have the subject placed directly in the center of the frame, which makes the picture look dull and uninteresting. To keep this from happening try to place the subject on one of the horizontal or vertical lines. The easy way to properly follow the rule of thirds is to not have your subject directly in the center square. Sound simple?
Now on to breaking the rule … a photographer may want to break the rule of thirds to add an artistic flair or to add drama to a photograph. But be aware that breaking the rule may be harder than it seems.
Hopefully this post will help you to understand the rule of thirds.
May 18, 2009
May 11, 2009
RAW vs. JPEG
What is the difference between the two file types? Well, JPEG (aka Joint Photographic Experts Group) is a is a commonly used method of compression for photographic images. The degree of compression can usually be adjusted, allowing a selectable trade off between storage size and image quality. JPEG typically achieves 10:1 compression with little perceptible loss in image quality. Hmmm ... "perceptible loss in image quality". Even though there is the word "little" in front of perceptible there is still a loss in image quality. JPEG compression, in my opinion, is a lousy format that throws away the data that you can’t see in order to give you smaller file sizes, but if you don't need high quality images and need a small file size JPEG is definitely for you.
Then what is RAW? A RAW image file contains minimally processed data directly from your camera's image sensor. RAW format is completely loss-less and keeps every piece of data your camera captures (even if you don’t need it). There is one down side though ... RAW format requires a good bit more space on your memory card because it does store every bit of information from your camera's sensor. However, a RAW file isn’t technically an "image file" (in the true since of the word). It has to be converted by special software on your computer and processed in order to be suitable for printing or exporting for other uses. So, why shoot in RAW format? Since RAW format stores every bit of data from your camera's sensor if you screw up a picture it is almost always fixable. Lets say you shoot a picture on a bright sunny day (a once in a lifetime photo) and you don't realize that it was overexposed until you get home and view it on you computer -- if you shot in RAW you could easily adjust the exposure to be properly exposed. So to sum this up, If you are not going to bother processing your photos, RAW is not for you.
So what does all of this mean for your pictures? Well there are pros and cons to shooting both RAW and JPEG images. Many people choose to shoot in JPEG format because it is a universal format which can be taken directly off of the camera and shared via email or published to the Internet. JPEG format also requires less storage space on your camera and computer. RAW, on the other hand, requires some post production work. You will need software to properly edit and export your photos. This software sometimes comes with you camera, and sometimes needs to be purchased. Programs like Aperture (from Apple), Adobe Lightroom, and Adobe Camera RAW in Photoshop are great programs for editing RAW files. I, being a Mac guy, prefer Aperture but I also use Photoshop quite a bit. But even if you view photography as a simple hobby, it is still worth investing in photo-management software like Aperture or Lightroom that make organizing, keywording, searching, and editing your RAW photos as simple as working with JPEGs.
I sure hope this helps you with your decision over the "Great Debate" of RAW vs. JPEG.
May 4, 2009
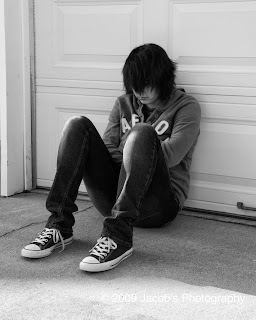
Black & White Photography In The 21st Century
So what is different about black & white photography nowadays as apposed to fifty years ago? Well, a good bit has changed. Most people now use a digital camera as apposed to a film camera, most people also edit their pictures on a computer instead of in a dark room (post-production), and most people shoot their pictures in color and then convert them to B&W. This post has to deal with the digital camera users since B&W film is still readily available.
So how do I shoot black & white photos with my digital camera? There are two different ways and the pros and cons of both will be discussed here.
You say your camera has B&W setting? Most DSLR’s and point and shoot cameras have a B&W option. This camera option can be useful if you do not plan on post production editing. To use this setting just go to your camera’s menu and select the Black & White or Monochrome setting and start shooting pictures. The big con is if you do decide to later edit the pictures you can but you will have much less flexibility with the editing options.
There is, however, another B&W option and in my opinion a better option. That option is to shoot your pictures in RAW format and convert them to B&W using Adobe® Photoshop, Apple’s Aperture, or your favorite photo editing software. I personally like, and use, the Aperture add-on Silver Efex Pro by NIK (the add-on is also available for Adobe® Photoshop Win & Mac). This software allows you to convert your color images to black & white with minimal effort. There are multiple choices for post-production image editing including: Neutral Exposure, Underexposure, Overexposure, High Structure, Pull Process N -1, Push Process N +1, Push Process N +2, Push Process N +3, High Contrast Red Filter, High Contrast Orange Filter, High Contrast Yellow Filter, High Contrast Green Filter, Full Spectrum, Full Spectrum Inverse, Dark Sepia, Soft Sepia, Ambrotype, Cyanotype, Tin Type, Infrared Film Normal, Infrared Film Soft, Soft Skin, Wet Rocks, Darken Contrast Vignette, Antique Plate I, Antique Plate II, Antique Solarization, Holga, and Pinhole. You can also simulate your favorite film type, and adjust brightness, contrast, and structure. There is also a ton of other options and settings within the Silver Efex Pro add-on. Apple’s Aperture, Adobe® Photoshop, and other photo editing software also have built in ways to convert your color images to black & white. If you would like to know more about Silver Efex Pro or any or any of the other fine software and add-ons NIK produces please check out NIK’s web site www.niksoftware.com.
On a quick side note, if you want to shoot infrared photography, there are companies that are now modifying DSLR cameras to be able to shoot infrared exclusively. If you are wondering why you cannot take infrared without a camera modification … it is because most camera manufacturers build their image sensors to block infrared light.
Well, I hope this has given you a jumping off point to go out and take your own B&W photos. Again remember that this is just my opinion and that there are many different ways to take or convert your own pictures to black and white.
Subscribe to:
Posts (Atom)